Rush SR Service Manual
  • Getting Started
    • Rush SR Specs
      • Why the GSXS-1000?
      • Dyno Sheet
    • Before Starting - Warnings
    • Removing Bodywork
    • Break-in and Initial Setup
      • Seat Mounting
      • Pedal Box Placement
      • Bedding Brakes
      • Engine Break-in
      • Driving and Shifting
    • Understanding Your Dash
  • Maintenance
    • Maintenance Schedule
      • Each Session
        • Torquing Wheels
        • Lubing Chain
      • Each Weekend
        • Checking Fuel Pressure
        • Clean & Adjusting Chain
        • Inspecting Nuts & Bolts
        • Checking Shock Pressure
        • Adjusting Throttle & Clutch Cable
      • Each Month/Quarter
        • Greasing Joints and Bearings
        • Changing Diff & Engine Oil
        • Inspecting & Bleeding Brakes
      • Each Year
        • Change Air Filter
        • Changing Coolant
        • Cleaning Fuel Filter
        • Inspecting Wheel Bearings
        • Rebuilding Shocks (Track Variable)
        • Cleaning Radiator
        • Replacing Chain (Track Variable)
        • Rebuilding Axles
      • Long-Term Maintenance (150hr+)
    • Fluids
    • Shock Diagrams
    • Torque Specs
    • Suzuki Service Manuals
    • Electronics and Wiring
      • Main Harness
      • Shift Harness
      • Dash Harness
    • Winterizing
    • Dash Alarms
    • Engine and Gearbox
  • Tunables
    • Factory Baseline Setup Guide
    • Anti-Roll Bars
    • Shock Adjustments
    • Gear Ratios / Sprocket Changes
    • Alignment and Ride Height
    • Diff Plate Stacks
    • Ballast
    • Chain Guards and Replacement
    • Left Foot Braking
    • Brake Pads and Rotors
    • Tires
    • Mirrors
  • Dash, Data, and SmartyCam
  • Wrapping Your Rush SR
  • Running & Consumables Costs
    • Comparison to Other Cars
  • Parts & Repair Costs
  • Transporting Your Rush SR
  • Competing in Events
    • Decals and Brand Assets
    • Technical Regulations
  • Getting Help
    • Rush SR Owners' Forum
    • Rush SR Facebook Community
  • Service Bulletins
    • 2023-05-19 Pedal Box Safety Notice
Powered by GitBook
On this page

Was this helpful?

Edit on GitHub
  1. Tunables

Anti-Roll Bars

PreviousFactory Baseline Setup GuideNextShock Adjustments

Last updated 1 year ago

Was this helpful?

The factory position of the Anti-Roll Bars (ARB) is 25mm, as measured below:

There are three "positions" for the ARB:

  1. Soft - The gold fitting is flush with the end of the sway bar

  2. Medium (default) - The gold fitting is 25mm away from the end of the sway bar

  3. Hard - The gold fitting is 50mm away from the end of the sway bar

Adjusting Sway Bars

Consider sitting in the car, then have a friend do the work. The rest of the car should be in race condition (same amount of gas, air pressure in tires, etc.)

  1. Park the car on a level surface.

  2. Remove both front sway bar end links.

  3. Set ends of the sway bar so they are close to parallel with the ground.

  4. Adjust both end links to the same length.

  5. Put one of the ends on and adjust the other so that there is no tension on the sway bar.

  6. Tighten up the jam nuts and the sway bar end link bolt. You’ll also want the heim joints parallel so they can move freely.

Then do the same procedure on the rear and you are set.

Thanks to Doug Larsen for this content.

On the factory setup guide it has us setting up with the car in the medium position for both the front and rear. Setting up sway bars is the last step in setting up your car: your should be already done. To set the preload to neutral or taking off preload on the sway bars, you are trying to eliminate any torque put on the sway bars placed on them by the natural lean/weight of the car. This puts torque on your sway bars when they should be neutral and waiting for a bump or turn.

ride height and corner balancing
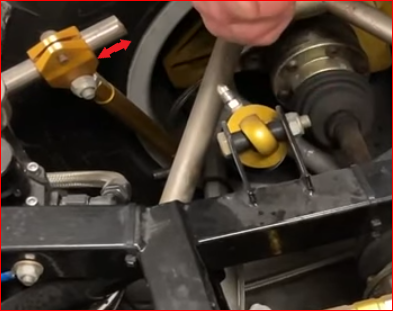
The red arrow is 25mm from the factory